Surviving your first week of Git without losing your mind
No matter what kind of software you are writing or what technologies and languages you are using, there is a good chance (~74% to be more precise) you need to learn how to use git.
The problem is... well, git is quite large and complicated. And the more you try to learn about it, the more confusing it tends to get. Sometimes even the most experienced developers have trouble making sense of it. So don't feel bad if you don't understand it just yet. In this article, I'll do my best to help you survive your first week of Git without loosing your mind.
Why git?
Git is a version control system. It tracks all the changes made to a project: deleted files, modified files, new files, when and who made those changes.
Not only that, but it also offers a convenient way of jumping from one point in history to another. This is useful when, for some reason, your project stops working correctly after introducing new changes. Git allows you to easily roll back to a specific point when you know the project is stable.
Apart from that, what makes git super useful is how easy it makes for developers to collaborate and work on the same project simultaneously, without stepping on each other's toes (most of the time anyway😅).
Repository & commits
A git project, also known as a repository, contains all files of the project and its entire revision history – every commit that was ever made. A commit is a perfect snapshot of the project at a specific point in time. The more commits you have, the more moments in history you can navigate to. That's why I recommend committing your work often.
Branches
To organize commits and to allow developers to work in parallel, git uses a concept called branching. Think of branches as different timelines of our project where we fix bugs or add new features that will eventually make their way into the main timeline (usually called the master branch).
When you branch out, you get a perfect copy of the project where you can do whatever you want without affecting the main timeline (master branch). When you finish working on your branch, you can merge back into master, creating a combination of the two branches.
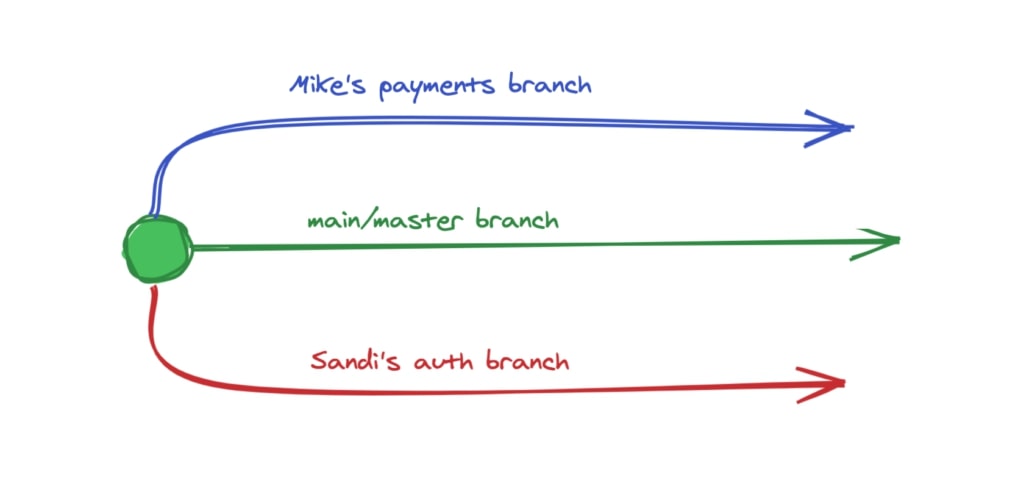
Consider the following example:

On the blue timeline, Mike has everything from the master branch plus his work on the payments system, while on the red timeline, Sandi has everything from the master branch plus her work on the authentication system.
None of them have each other's work just yet, though.
The master branch is the timeline where all the other branches will be merged in. When Sandi and Mike finish their work, they will both merge their branches into the master branch. Once they do that, they will continue to branch out and merge in their new branches until the end of the project.

Merge requests
Those red and blue circles from the image above merge requests, sometimes called “pull requests”. A merge request is a formal way of asking to merge your branch into another one.
When you create a merge request with a source code hosting application like Gitlab, you can see every change your branch will introduce. This allows you and your team to review and discuss the changes before merging them.
Workflow
You can work with git either from the command line or by using a dedicated client like SourceTree. Or even from your code editor as most of them support git out of the box or have plugins you can install.
However, I strongly recommend trying git from the command line before moving to a dedicated client application. While git can get complicated, you can get away with just a handful of git commands most of the time.
Identify yourself
The first thing you need to do after downloading and installing git is to identify yourself. Git needs to know who you are to set you as the author of the commits you will be making. You only need to do this once.
git config --global user.name "Your full name"
git config --global user.email "[email protected]"
The path you are on when you run the commands above doesn't matter, but from now on, you must run every git command inside your project's root directory.
cd /the/exact/path/to/your/project
Starting out
You can find yourself in two contexts: either you need to start a git repository from scratch or work on an already existing repository created by someone else.
In both scenarios, you'll need the git repository remote address from your Git hosting service (Gitlab, Github, Bitbucket, to name a few).
If you're starting a new project from scratch, you'll need to go inside the project's root directory, initialize it as a new git repository, and set its remote address.
# inside my project's directory
git init
git remote add origin https://your-repository-remote-address.git
Although your project will have a single remote most of the time, you can actually add more remotes – that's why the command is git remote add.
git remote– tells git you want to do something remote related.addis what you want to do, which is to “add a new remote.”originis the name of the remote. It can be anything you want. I named it origin by convention.https://your-repository-remote-address.gitis the remote address of the repository from your Git hosting service and where you will push your commits. If you need to work on an already existing project, you have to clone the repository – which essentially means you have to download the project files and it's entire revision history – every commit that was ever made.
To do so, create a new directory for your project and run the following git command:
# inside my project's directory
git clone https://your-repository-remote-address.git .
Caution: make sure the directory is completely empty and that you add the dot after the remote address. The dot tells git to download the files in this exact location. Also, when you are cloning an existing repository, there's no need to re-initialize it or add the remote again – everything is already configured.
Pulling changes
As you saw in the image above, developers branch out from the master branch, work on their branches, and then merge them back into master. Whenever that happens, your local master branch becomes outdated. It doesn't have the changes made on the git hosting service, so you'll have to pull them.
Pulling refers to downloading the repository's latest changes from the git hosting service and updating your local repository. As with everything software, you want to keep things updated.
# inside my project's directory
#git pull <remote> <branch>
git pull origin master
Make sure you replace origin and master if you named your remote and main branch differently.
Creating and switching branches
Every time you start working on a feature or a bug, pull from master to update your repository, and then create and switch to a new branch. Never work directly on the master branch. You should only update the master branch via merge requests (to be discussed later).
The first step before making any changes is to pull and then create and switch to a new branch:
# inside my project's directory
# checks for changes and updates the local repository
git pull origin master
# create and switch to new branch
git checkout -b my-feature
From now on, every change you will make will be on this my-feature branch – the master branch won't be affected.
Your branch name should reflect what it is that you are working on. If it's a new feature, name the feature. If it's a defect fix, name the defect. If it's a performance improvement, name the improvement you are making. If you're just getting started and don't know how to name your branch, go with dev-yourName.
To switch to another branch, type in your terminal:
# inside my project's directory
# git checkout <branch name>
git checkout master
Continue reading to see how you can add new files, make changes, and merge your branches into the master branch.
Adding new files
Even though the repository is initialized (either from scratch or cloned), you must manually add every new file you create to the repository. Luckily, you can add multiple files at once, so you don't have to type in all the file paths.
# inside my project's directory
git add relative/path/to/the/file.txt
git add relative/path/to/directory
git add .
The first git command adds a single file to the repository, the second adds an entire directory, while the last command adds every new directory and file created.
Git status
You'll often need to check your repository's status: what files you can add, what files were changed, or have been deleted. To do so, run the following command:
# inside my project's directory
git status
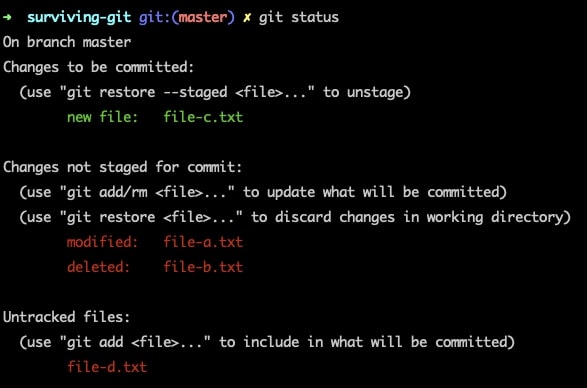
You will get back an output that looks somewhat like the one below:

Changes to be committed is also known as the stage. It tells you what files would be committed if you were to create a new commit right now.
Changes not staged for commit displays changes to files git knows about but that are not prepared to be committed – these changes won't be included if you were to create a commit right now. To add those files to the stage, run the git add . command.
Untracked files are the files git doesn't know about just yet. It doesn't care what happens to them. If they were to be deleted, git wouldn't bat an eye – they are untracked. To commit these files, you need to add them by using the git add command.
Creating commits
Once you've added your files to the stage by using git add ., you can create a new commit – all it needs is a message that describes the changes you've made:
# inside my project's directory
# add all files to stage
git add .
# create commit
git commit -m "Replace old logo"
From now on, you can continue making changes to your project and create more commits. It's essential to commit your changes often to build a good revision history with multiple places in time where you can restore to. If our project was a single giant commit, there wouldn't be any undo options – we wouldn't have the possibility to restore our changes if we needed to. Commit your work often.
Pushing changes
If pulling means download changes (other commits), pushing means upload changes.
After pulling from master, creating a new branch, and committing your work, it's time to push your branch to the git hosting service, where you can create a merge request to have it merged into the master branch.
Before you push your changes, pull from master again just to make sure your local master branch is up to date. Once you've done that, push your branch using the following command:
# make sure everything is up to date. pull from <remote> <branch>
git pull origin master

# push to <origin> <this-branch>
git push origin my-feature
You can push your branch multiple times just as you can pull multiple times. Say you already pushed a branch, but you saw one file missing. You can stage the file with git add ., commit it with git commit -m "Add x file", and push your branch again with git push origin my-feature. However, if your branch was already merged into master, you will have to create an additional merge request from the same my-feature branch into the master branch.
Merge requests Before we merge our branch it would be nice to have one final look over our changes, just to make sure we haven't missed anything, or even better, add a new pair of eyes by inviting a colleague to look over our changes. That's what merge requests are for!
While the user interface might vary, the steps to create new merge requests are usually:
- click the appropriate button (create merge/pull request)
- select the branch you want to merge and the destination branch (where you want to merge it, usually master)
- select one or more reviewers (if needed)
- confirm your action.
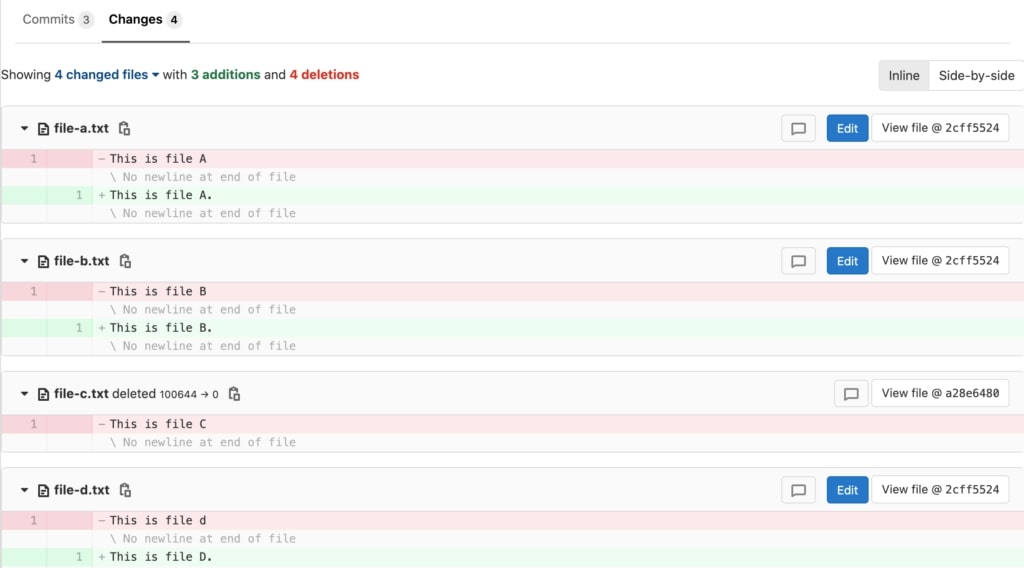
After creating the merge request, you will see a list where you can review each individual commit or just look over the whole change list caused by all the commits.

For example, in the above image, git tells us we have four changed files with three additions and four deletions. All file contents will end in an uppercase letter and a dot, while file-d.text will be deleted entirely. Keep in mind that additions and deletions refer to the number of lines added and deleted, not the number of affected files.
As you discuss and receive feedback, you can continue to make changes to your branch while the merge request is open by following the same steps: make changes locally, commit, push your branch again. The merge request will be updated with your new changes, and the review can resume.
Once your branch is merged into master, you can start working on something else by checking into the master branch, pulling the updates, and then checkout to a new branch that will eventually make it's way back into master via a merge request.
# on branch my-feature that was recently merged into master

# checkout to master
git checkout master

# pull the latest changes
git pull origin master

# checkout to a new branch
git checkout -b my-new-branch

# time passes, changes are made, commits are added...
git push origin my-new-branch

# create new merge request, have it approved, and repeat from the top
Handling merge conflicts
While git empowers us to work in parallel, occasionally you will run into conflicts. Somebody, maybe even you, made changes to the exact same line, in the exact same file, on a different branch that was already merged into master – this will cause a conflict.

While git is smart and all, sometimes it gets confused and doesn't know who to trust and pick the correct change. You'll have to help it decide which changes are the correct ones.
Pulling from the branch you want to merge to will show you the conflicted files. In our case, we have a conflict in file-b.txt:

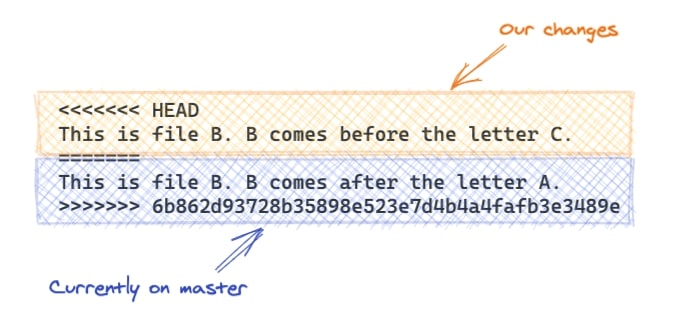
If we open the file in our code editor, we'll see some of our code split into two sections:

The code between <<<< HEAD and === are the changes made by our branch, while the other section shows us what's currently on master.
We have three options:
- keep what is currently on master – that means deleting everything except
This is file B. B comes after the letter A. - decide our changes are the correct ones – that means deleting everything except
This is file B. B comes before the letter C. - replace everything with a combination of both –
This is file B. B comes between the letter A and C.
Once you fixed all the conflicts, stage the files, create a new commit, and push your branch again:
# after fixing conflicts

# stage everything
git add .

# create commit
git commit -m "Fixed merge conflicts"

# push branch
git push origin my-branch-name
You might have multiple conflicts in the same file. The idea is the same. What's between <<<HEAD and ==== is your change, what's between === and the hash is what's currently on that branch. Decide which change is the correct one, commit your decision, and push your branch again.
To reduce the risk of conflicts, pull from master often, and especially pull every time you start a new branch – this way, you make sure you start from the latest version of the master branch.
Entire flow recaped
# identify yourself
git config --global user.name "Your full name"
git config --global user.email "[email protected]"


# go to your project's root directory
cd /the/exact/path/of/my/project

# initialize a new project and add the remote
git init
git remote add origin https://url-got-from-git-hosting.git

# or clone an existing repository
git clone https://url-got-from-git-hosting.git .

# pull from master
git pull origin master

# checkout to a new branch
git checkout -b my-branch

# make changes, stage the files, and then commit them
git add .
git commit -m "My changes"

# push your branch
git push origin my-branch

# create a merge request, discuss your changes
# fix conflicts if any
git pull origin master

# open the conflicting files in your editor.
# decide what changes are the correct ones.
# stage the files and create a new commit.
# push your branch again.
git add .
git commit -am "Fixes merge conflicts"
git push origin my-branch

# once your branch is merged, checkout to master, pull changes, and start a new branch
git checkout master
git pull origin master
git checkout -b my-new-branch

# rinse and repeat from the top.
As I said at the beginning of this post, git is quite large and complicated. There are numerous different ways of doing what we just learned. There are also many other concepts and commands we haven't covered: releasing versions, cherry-picking, resets, squashing, to name a few.
This been said, I'm confident this post will be good enough for someone who is new to git and needs to learn the basics of it. I hope it helped you.
